
If Still Malware exist Steps to Do
Malware is still existing then you need to do more steps like that;
Change the Password of C-pannel
Using Password reset option
Using Password & Security menu
First of all, keep in mind that you have an opportunity to log in your Hosting account directly from the Namecheap. Thus, you don’t need to remember your cPanel login details, it’s enough to remember only one set of login details – Namecheap account credentials.
So, if you forgot your cPanel password, or the one provided in the welcome email does not work, you can simply log into cPanel via your Namecheap Account Panel.
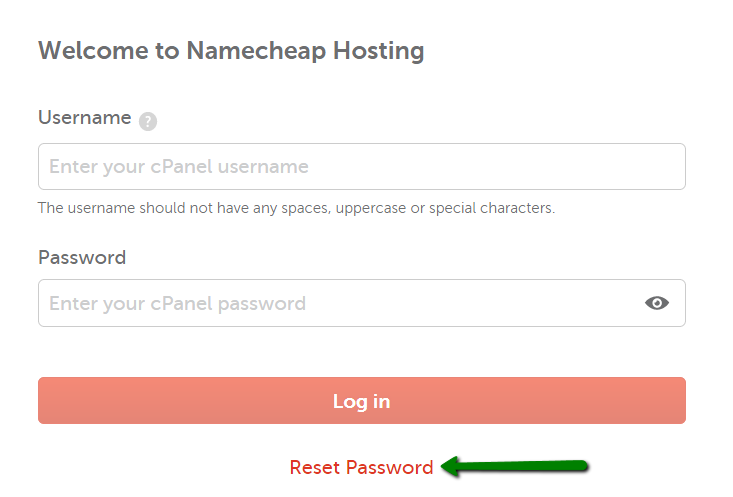
If you would like to log in through cPanel login page, you can reset the password following these steps:
1. Click Reset Password on the main cPanel login page:
2. Enter your cPanel username and click on Reset password:

3. On the next page, enter your contact email address and click on the Send Security Code button:

4. Once done, the email with the confirmation code will be sent to the contact email address assigned to your hosting account. It is better not to close password reset page as you may need to enter a confirmation code on it.
Below you can see the example of the email:

5. Go back to cPanel page, enter the security code and hit Submit:

6. Once done, the window with the new password appears, use it to log into your cPanel account.
NOTE: If you do not receive the email within 10-15 minutes, feel free to contact us via Helpdesk so that we can assist you with the password change.
If you know your current password, you can change it in your cPanel >> Preferences section >> Password & Security menu:

Fill in the required fields with the Old and the New password you wish to use and hit Change Password:

Change the password of wordpress
First you need to login to the cPanel dashboard of your WordPress hosting account. Next, you need to click on the phpMyAdmin icon under the database section.

This will launch the phpMyAdmin app where you need to select your WordPress database.

You will now see the list of tables in your WordPress database. Now you need to look for the ‘{table-prefix}_users’ table in this list and click on the ‘Browse’ link next to it.

Note: Table names in your WordPress database may have a different table prefix than the one we are showing in our screenshot.
You will now see the rows in your WordPress users table. Go ahead and click on the edit button next to the username where you want to change the password.

PhpMyAdmin will show you a form with all the user information fields.
You will need to delete the value in the user_pass field and replace it with your new password. Under the function column, select MD5 from the drop down menu and click on the Go button.

Your password will be encrypted using the MD5 hash and then it will be stored in the database.
Congratulations! You have successfully changed your WordPress password using phpMyAdmin.
Now some of you may be wondering why did we select the MD5 hash to encrypt the password.
In the older version, WordPress used MD5 hash to encrypt passwords. Since WordPress 2.5, it started using stronger encryption technologies. However, WordPress still recognizes MD5 to provide backward compatibility.
As soon as you login using a password string stored as a MD5 hash, WordPress recognizes it and changes it using the newer encryption algorithms.
Change the password of database
To set a new password for a MySQL database user:
- Log into cPanel and click MySQL Databases in the Databases section:

- In the Current Users section, click Set Password next to the desired database user:

Note: If you are making changes to a website and do not know which user to edit, you may view the user the site is connecting with in its configuration file:- Location of Script Configuration Files
- Enter a new password, re-enter the password, then click the Change Password button:

Note: You may use the generate password button to randomly generate a secure password.
Re-Configuring Your Code
If you needed to reset the password to fix a website installation, the site’s configuration file needs to be updated. Once the configuration file has been updated to reflect the new password, the site should work as it was prior.
If you are unsure of where your configuration file is, the following article will help you locate the file you need to edit the database password within:
- Location of Script Configuration Files
Change the password of ftp
Once logged into the FTP Manager:
- Scroll down to FTP Accounts, and find the account that needs to be updated.
- Click Change Password.
- Enter a new password and click the Change Password button.Make sure passwords match and meet strength requirements to ensure the update completes.
When you have successfully reset your FTP Password, attempt your FTP connection again. If you continue to have problems, see FTP – Uploading the website to make sure your settings are correct.
That’s it!
Next step is Check Your Site 3 to 4 Days After Malware Removal
